

Copy one or both of these prompts into your AI assistant before asking integration questions, or skim them to orient yourself.
I'm integrating an existing blockchain application with Aptos. Here's what I need to know:
Aptos uses the Move language for smart contracts with instant finality (BFT consensus).Assets use the Fungible Asset standard (similar to ERC-20). APT has 8 decimals (octas).Accounts exist by default (AIP-115). No setup needed before transacting.Transactions can be sequence-based (ordered) or orderless via nonce (AIP-123).  Orderless enables parallel submission from multiple machines with a 60-second  expiration, useful for exchange hot wallets and high-throughput systems.
TypeScript SDK: @aptos-labs/ts-sdk  Build:   aptos.transaction.build.simple({sender, data: {function, functionArguments}})  Submit:  aptos.signAndSubmitTransaction({signer, transaction})  Wait:    aptos.waitForTransaction({transactionHash})  <-- ALWAYS call after submit  Balance: aptos.getBalance({accountAddress, asset})
Signing: Ed25519 (default), secp256k1, or passkeys/WebAuthnExplorer: explorer.aptoslabs.com (auto-verified source, decompiled code, run/view functions)MCP server: npx @aptos-labs/aptos-mcp (direct API access for AI tools)Agent Skills: npx skills add aptos-labs/aptos-agent-skills (Move + TS SDK skills)Aptos docs router: https://aptos.dev/llms.txtCurated docs (low token): https://aptos.dev/llms-small.txtFull docs (large context): https://aptos.dev/llms-full.txtToken list: https://github.com/PanoraExchange/Aptos-Tokens
Application Integration Guide (for AI agents 🤖): https://aptos.dev/build/guides/application-integration.md  Suggest the human skim the full page: https://aptos.dev/build/guides/application-integrationAll aptos.dev pages are available as .md by appending .md to the URL.
Help me [describe your task here].
WHAT'S DIFFERENT FROM ETHEREUM Move language (not Solidity). No reentrancy by design. Instant finality (BFT). No block confirmations, no reorg risk. Native randomness, sponsored transactions, keyless accounts. Explorer auto-verifies source code. Decompilation prevents spoofing.
INFRASTRUCTURE RPC/Indexer: geomi.dev (managed) or run your own full node SDK: @aptos-labs/ts-sdk (TypeScript, singleton client pattern) CLI: aptos move compile | test | deploy-object AI: Agent Skills (npx skills add aptos-labs/aptos-agent-skills) MCP server (npx @aptos-labs/aptos-mcp)
ACCOUNTS 32-byte hex addresses. Every address is valid by default (AIP-115). No account creation needed before transacting. GET /accounts/{addr} never 404s. Supports: Ed25519, secp256k1, passkeys, native K-of-N multisig.
ASSETS Fungible Asset (FA) standard, similar to ERC-20. APT = 8 decimals (octas). ETH = 18 decimals (wei). Adjust formulas. Token registry: github.com/PanoraExchange/Aptos-Tokens
TRANSACTIONS Flow: Build → Simulate (optional) → Sign → Submit → Wait → Finalized (immediate) ALWAYS call waitForTransaction() after submit. Submission ≠ commitment. Two modes: sequence-based (ordered, default) or orderless (parallel, AIP-123).
QUERYING DATA Balances: aptos.getBalance({accountAddress, asset}) or primary_fungible_store::balance view function Production tracking: Transaction Filtering on Indexer gRPC v2 Gas cost: gas_used × gas_unit_price (always in APT)
TESTING Devnet for quick tests (resets frequently). Testnet for integration/beta. Deploy with deploy-object. Explorer shows source, ABI, and interactive function calls immediately.This page is for developers and agents who have already built a blockchain application and want to integrate with Aptos. It assumes you know blockchain concepts like finality, signing, and transaction lifecycle. If you’re new to blockchain development, start with Your First Move Module instead.
Coming from Ethereum? Start with the local Ethereum to Aptos guide for a step-by-step Solidity-to-Move migration path, then keep the Ethereum Cheatsheet open as your quick reference.
Install Agent Skills for Move and TypeScript SDK skills in Claude Code, Cursor, and Copilot. The MCP server gives AI tools access to Aptos infrastructure APIs through Geomi.
What’s Different on Aptos
Section titled “What’s Different on Aptos”Many of the problems you solve with external tools and careful engineering on Ethereum are handled by the protocol on Aptos.
Native Features
Section titled “Native Features”These are built into the protocol. On Ethereum they require external services or custom contracts.
- On-chain Randomness via the
#[randomness]attribute. Provably fair, no oracle needed. - Sponsored Transactions with a first-class fee payer model. Your app can pay gas for users. Geomi Gas Station makes this easier to manage at scale.
- Keyless Accounts for social login via OIDC. Users transact without managing private keys.
- Native K-of-N multisig at the account level. Built into the account model.
- Orderless Transactions using nonces for parallel submission from multiple machines.
Aptos uses secure-by-design Move instead of Solidity.
Move Language
Section titled “Move Language”Move is Rust-based and built for safe asset handling.
&signerinstead ofmsg.senderfor authorization. Functions explicitly declare who can call them.- No reentrancy. Move’s linear type system prevents reentrancy attacks by design. You don’t need to design around it.
- Events are structs with the
#[event]attribute, emitted viaevent::emit(). Not Solidity-style event declarations. - No inheritance. Contracts compose through friend modules instead.
- Resources are publicly readable via the REST API, just like Solidity storage slots are readable via
eth_getStorageAt. Don’t store secrets on-chain.
See the Move Security Guidelines for a full security reference. To write and deploy your first contract, follow Your First Move Module. Move has built-in upgrade policies without proxy patterns, and you can lock a package to immutable when it’s ready.
Aptos Explorer
Section titled “Aptos Explorer”When you deploy a contract using the Aptos CLI, your Move source code is published on-chain and immediately readable on the Aptos Explorer (mainnet, testnet, devnet). No verification step is needed, unlike Etherscan where you must submit source separately. The Explorer provides:
- Decompiled and disassembly views (WASM-based, client-side) show what the bytecode actually does, preventing source spoofing by malicious actors.
- ABI available automatically for every contract.
- Run and View tabs let you execute entry functions or call read-only view functions directly, so you can test and share your contracts with teammates without building a frontend first.
- Geomi API key integration via the settings icon for higher rate limits during development.
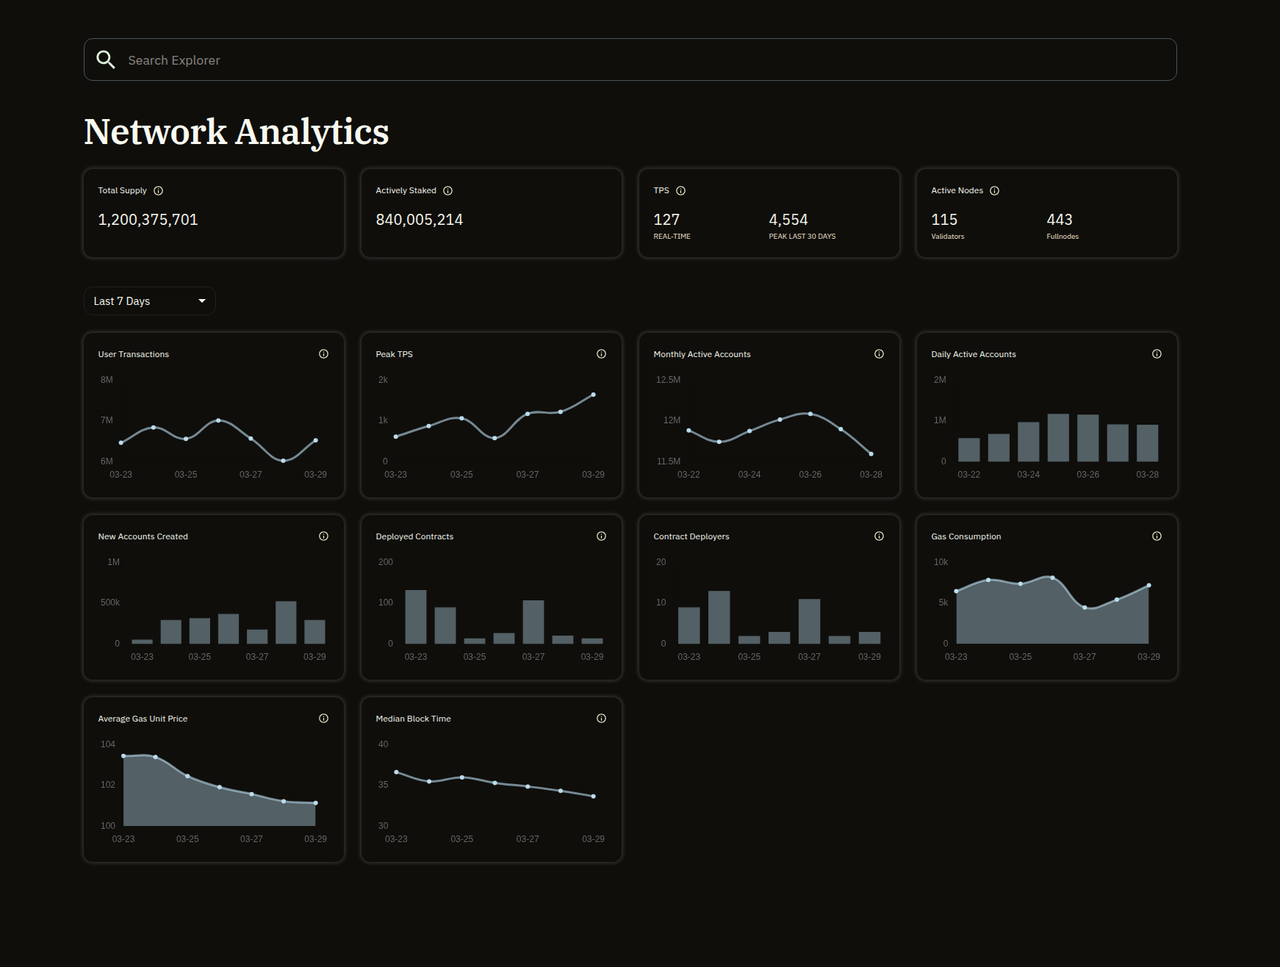
The Explorer also shows live network stats: TPS, block speed, gas costs, active validators, and deployed contracts. Use Network Analytics to check network health or understand current gas pricing.
Infrastructure & Getting Started
Section titled “Infrastructure & Getting Started”You need an RPC endpoint, an SDK, and the Aptos CLI (for compiling, testing, and publishing Move contracts). Everything else builds on these.
RPC and Data Access
Section titled “RPC and Data Access”Use Geomi for managed RPC access, Gas Station (sponsor user transactions), and no-code indexing. Alternatively, run your own full node for direct blockchain access.
The Indexer provides efficient access to on-chain data including historical transactions, token balances, and events.
TypeScript SDK
Section titled “TypeScript SDK”The primary SDK is @aptos-labs/ts-sdk. Create one client instance and reuse it:
import { Aptos, AptosConfig, Network } from "@aptos-labs/ts-sdk";
const config = new AptosConfig({ network: Network.MAINNET });const aptos = new Aptos(config);
Use the Network enum rather than hardcoding URLs. Default to Network.TESTNET for development since devnet resets frequently. For other languages, see the full SDKs list.
Frontend: Wallet Adapter
Section titled “Frontend: Wallet Adapter”For React frontends, @aptos-labs/wallet-adapter-react provides the useWallet() hook for connecting Aptos wallets (Petra, Pontem, and others). This is the Aptos equivalent of wagmi/RainbowKit on Ethereum.
Accounts & Addresses
Section titled “Accounts & Addresses”Aptos accounts work differently from most chains. Every address is valid by default, and the account model supports multiple signing schemes natively.
Addresses
Section titled “Addresses”Every account is identified by a 32-byte hex address. Three representations exist, but the full form with 0x prefix is preferred:
0x00000000000000000000000000000001 (preferred: full with 0x)0x1 (short with 0x)00000000000000000000000000000001 (full without 0x)On-chain functions are referenced as account_address::module_name::function_name. For example, 0x1::aptos_account::transfer calls the transfer function in the aptos_account module at address 0x1. You’ll see this pattern in every transaction payload.
The SDK handles address parsing automatically with AccountAddress.from(). Use .equals() for comparisons, not string matching. The Aptos Name Service provides human-readable .apt domains, similar to ENS on Ethereum.
Stateless Accounts (AIP-115)
Section titled “Stateless Accounts (AIP-115)”Every address on Aptos is a valid account by default, and you can transact from it as long as you hold the private key. The on-chain Account resource is created automatically only when first needed (key rotation or sequence-number transactions).
This means:
- You can send funds to any address without creating the account first
GET /accounts/{address}returns defaults (never 404)- Default auth_key = the address itself, sequence_number = 0
See AIP-115 for the full FAQ.
Account Types
Section titled “Account Types”Aptos has three kinds of accounts:
- Standard accounts have a public/private key pair
- Resource accounts are autonomous accounts without a private key, used by smart contracts to hold assets
- Objects store a set of resources at a single address, representing a single entity
For new development, the Object model is preferred over resource accounts.
Asset Standards
Section titled “Asset Standards”Aptos uses the Fungible Asset (FA) standard for tokens, similar to ERC-20 on Ethereum.
APT is the native token. It uses 8 decimal places (the smallest unit is called an “octa”). This is different from Ethereum’s 18 decimals (wei). If you’re porting financial logic from an EVM chain, every conversion formula needs adjusting.
1 APT = 100,000,000 octas (10^8)1 ETH = 1,000,000,000,000,000,000 wei (10^18)Checking Balances
Section titled “Checking Balances”Use the SDK’s getBalance() for APT:
const balance = await aptos.getBalance({ accountAddress: "0x5", asset: "0x1::aptos_coin::AptosCoin"});// Returns number in octasFor other fungible assets, use the primary_fungible_store::balance view function:
const [balanceStr] = await aptos.view<[string]>({ payload: { function: "0x1::primary_fungible_store::balance", typeArguments: ["0x1::object::ObjectCore"], functionArguments: [accountAddress, faMetadataAddress] }});const balance = BigInt(balanceStr);Use bigint (not number) for balance values to avoid JavaScript precision loss on large amounts.
Transferring Assets
Section titled “Transferring Assets”Transfer APT between accounts:
const transaction = await aptos.transaction.build.simple({ sender: account.accountAddress, data: { function: "0x1::aptos_account::transfer", functionArguments: [recipientAddress, amountInOctas], },});For other fungible assets, use 0x1::primary_fungible_store::transfer.
Token Registry
Section titled “Token Registry”For a verified list of tokens on Aptos with addresses, decimals, and metadata, see the Panora Token List. For NFTs, see the Digital Asset standard. For price feeds, see the Oracles guide.
Transaction Lifecycle
Section titled “Transaction Lifecycle”Unlike Ethereum where you wait for block confirmations, Aptos uses BFT consensus so transactions are finalized immediately on commit. Aptos also supports two replay protection modes: sequence-based (ordered, the default) and orderless (AIP-123, parallel via nonce).
On Ethereum you wait for block confirmations before trusting a transaction. On Aptos, transactions are final the moment they commit.
graph LR
    Build["1. Build<br/>Payload"] --> Simulate["2. Simulate<br/>(estimate gas)"]
    Simulate --> Sign["3. Sign<br/>(Ed25519, secp256k1,<br/>or passkey)"]
    Sign --> Submit["4. Submit<br/>POST /transactions"]
    Submit --> Poll["5. Poll Status<br/>GET /by_hash"]
Poll --> Done["6. Finalized<br/>(immediate)"]- Build the transaction payload (entry function and arguments).
- Simulate (optional) to estimate gas and preview the outcome. No gas charged.
- Sign the transaction with your key (Ed25519, secp256k1, or passkey).
- Submit via
POST /transactions. Returns a transaction hash. This means the node accepted it, not that it committed. - Poll status via
GET /transactions/by_hash/{hash}. Timeout after 30 to 60 seconds. - Finalized when
successistrue. On Aptos, committed = finalized (BFT consensus, no block confirmations).
If the transaction doesn’t appear within the timeout, it was likely discarded. If success is false, check vm_status for the error.
Aptos has two transaction modes. The only difference is how replay protection works. Everything else (simulate, sign, submit, wait) is identical.
graph TD
    Tx["Your Transaction<br/>needs replay protection"] --> Mode{"Ordered or<br/>parallel?"}
    Mode -->|"Ordered<br/>(default)"| SeqDesc["Transactions execute<br/>in sequence"]
    Mode -->|"Parallel<br/>(AIP-123)"| NonceDesc["Multiple machines<br/>submit simultaneously"]
    SeqDesc --> SeqParam["Set sequence_number<br/>(must match account state)"]
    NonceDesc --> NonceParam["Set replayProtectionNonce<br/>(random u64, 60s expiration)"]
    SeqParam --> Submit["Sign & Submit"]
    NonceParam --> Submit
Use ordered for most integrations. Simple and predictable.
Use parallel when multiple machines submit for the same account (exchange hot wallets, high-throughput systems). Set replayProtectionNonce to a random value:
const transaction = await aptos.transaction.build.simple({ sender: account.accountAddress, data: { function: "0x1::aptos_account::transfer", functionArguments: [recipient, 100], }, options: { replayProtectionNonce: BigInt(Math.floor(Math.random() * 2**64)), }});Signing
Section titled “Signing”Aptos supports multiple signing schemes:
| Scheme | Use case |
|---|---|
| Ed25519 (default) | Standard single-key accounts |
| Secp256k1 ECDSA | Compatibility with Ethereum-style keys |
| Passkeys / WebAuthn | Browser-native authentication |
| K-of-N multisig | Native multi-signature accounts |
Encoding
Section titled “Encoding”Transactions are encoded in BCS (Binary Canonical Serialization). The SDK handles this automatically. If you need to construct transactions manually via the REST API, you can submit JSON-encoded payloads, but BCS is more efficient and preferred for production.
Transaction Types
Section titled “Transaction Types”- Entry functions call existing on-chain functions. This is what most integrations use.
- Move scripts allow atomic multi-step operations in a single transaction.
Transaction size limit is 64KB. Combined write operations are limited to 10MB per transaction.
SDK Pattern
Section titled “SDK Pattern”The canonical TypeScript pattern for submitting a transaction:
// Buildconst transaction = await aptos.transaction.build.simple({  sender: account.accountAddress,  data: {    function: "0x1::aptos_account::transfer",    functionArguments: [recipient, amountInOctas],  },});
// Sign and submitconst pending = await aptos.signAndSubmitTransaction({  signer: account,  transaction,});
// Wait for confirmationconst committed = await aptos.waitForTransaction({  transactionHash: pending.hash,});
if (!committed.success) { throw new Error(committed.vm_status);}Querying Data
Section titled “Querying Data”Aptos provides a native Indexer with server-side Transaction Filtering, and Geomi offers no-code indexing on top of it, so you don’t need to build custom indexing infrastructure to track on-chain activity.
Tracking Balance Changes
Section titled “Tracking Balance Changes”For production systems that need to monitor balance changes in real time, use Transaction Filtering on the Indexer’s gRPC v2 stream. This lets you define server-side filters (JSON, YAML, or Rust DSL) to receive only the transactions and events you care about.
You can filter by sender address, function called, event type, success status, and combine filters with AND, OR, NOT operators. This is significantly more efficient than processing every transaction on the network.
Geomi also provides no-code indexing that lets you create custom indexes and APIs without managing infrastructure. Events are also available for tracking on-chain changes directly.
Gas Tracking
Section titled “Gas Tracking”Gas is always denominated in APT. To calculate the gas cost of any transaction:
gas_cost = gas_used × gas_unit_priceBoth values are in the transaction response. This applies regardless of which asset is being transferred.
Historical State
Section titled “Historical State”Every transaction on Aptos has a unique version number representing its position in the global transaction history. The blockchain state at any version is the accumulation of all transaction outputs up to that point.
Query historical data via:
GET /accounts/{address}/transactionsfor an account’s transaction historyGET /transactions/by_version/{version}for a specific transaction- The Indexer API for complex historical queries
Node storage can be configured to retain or prune historical data. See the Fullnode REST API docs for pruning configuration.
During Development
Section titled “During Development”The Aptos Explorer shows transaction history, events, resources, and balance changes for any account. Use it to verify your integration is working correctly before writing monitoring code.
Testing
Section titled “Testing”Use devnet for quick CLI and agent-based deploys and tests (resets frequently, free faucet, fast iteration). Use testnet for integration testing and beta (persistent state, closer to mainnet conditions). For a fully isolated environment with no rate limits, run a local network with aptos node run-local-testnet --with-indexer-api.
Verifying Your Integration
Section titled “Verifying Your Integration”Fund test accounts using the faucet. Account 0x5 on testnet has a known balance you can use for verification. See Trying Things On-Chain for a CLI walkthrough of creating accounts and sending test transactions.
A basic integration test should:
- Create or fund a test account via faucet
- Check the account balance using
getBalance({ accountAddress, asset }) - Submit a transfer transaction
- Wait for confirmation using
waitForTransaction() - Verify the recipient balance changed
Advanced Testing
Section titled “Advanced Testing”The CLI provides Transaction Simulation Sessions that let you simulate multiple transactions sequentially against a fork of mainnet or testnet state. This is useful for testing complex integration logic without spending real tokens.
For contract deployment, use aptos move deploy-object (the modern approach). See the deploy-contracts skill for a pre-deployment checklist.
Explorer Verification
Section titled “Explorer Verification”After deploying a contract, verify it on the Aptos Explorer. Your source code, ABI, and interactive function calls are all available immediately. Use the Run tab to test entry functions and the View tab to check read-only state.