

The Aptos blockchain allows developers to write Turing complete smart contracts (called “modules”) with the secure-by-design Move language. Smart contracts enable users to send money with the blockchain, but also write arbitrary code, even games! It all starts with the Aptos CLI creating an account which will store the deployed (”published”) Move module.
This tutorial will help you understand Move Modules by guiding you through setting up a minimal Aptos environment, then how to compile, test, publish and interact with Move modules on the Aptos Blockchain. You will learn how to:
- Setup your environment, install the CLI
- Create a devnet account and fund it
- Compile and test a Move module
- Publish (or "deploy") a Move module to the Aptos blockchain
- Interact with the module
- Keep building with Aptos (next steps)
1. Setup
Section titled “1. Setup”Changes to the blockchain are called “transactions”, and they require an account to pay the network fee (”gas fee”). We will need to create an account with some APT to pay that fee and own the published contract. In order to do that, we will need to use the Aptos CLI.
-
Install the Aptos CLI
Install the Aptos CLI (if you haven't already).
-
Open a new terminal
Open a new terminal window or tab.
-
Verify the installation
Run
aptos --versionto verify you have it installed.Terminal window aptos --versionYou should see a response like
aptos 4.6.1. -
Create a project folder
Create a new folder for this tutorial by running:
Terminal window mkdir my-first-module -
Navigate to the project folder
Run
cd my-first-moduleto go into your new folder. -
Initialize your account
Run
aptos initand press 'enter' for each step of setup to create a test account ondevnet.You should see a success message like this:
Terminal window ---Aptos CLI is now set up for account 0x9ec1cfa30b885a5c9d595f32f3381ec16d208734913b587be9e210f60be9f9ba as profile default!{"Result": "Success"}
2. (Optional) Explore What You Just Did On-Chain
Section titled “2. (Optional) Explore What You Just Did On-Chain”-
Copy your account address
Copy the address from the command line for your new account.
The address looks like this
0x9ec1cfa30b885a5c9d595f32f3381ec16d208734913b587be9e210f60be9f9baand you can find it in the line:Terminal window Aptos CLI is now set up for account 0x9ec1cfa30b885a5c9d595f32f3381ec16d208734913b587be9e210f60be9f9ba as profile default! -
Open the Aptos Explorer
Go to the Aptos Explorer.
This is the primary way to quickly check what is happening on devnet, testnet, or mainnet. We will use it later on to view our deployed contracts.
-
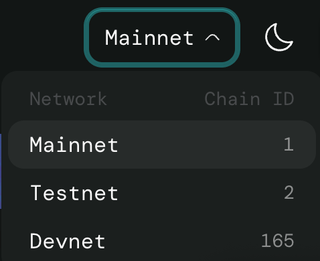
Ensure you are on Devnet network.
Look for “Devnet" in the top right corner, or switch networks by clicking the “Mainnet” dropdown and selecting Devnet
-
Search for your account
Paste your newly created address into the search bar.
-
View the search results
Wait for the results to appear, then click the top result.
-
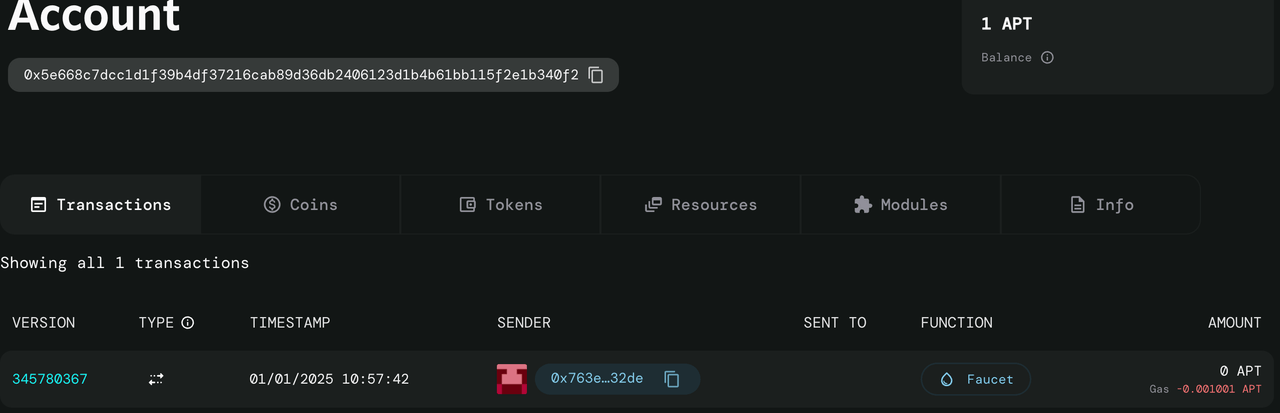
Check the transaction
You should see your newly created account and a transaction with the faucet function, funding it with devnet tokens.
-
Verify your balance
Click the "Coins" tab to see that you have 1 APT of the Aptos Coin. This will allow you to publish and interact with smart contracts on the aptos devnet.
3. Writing and Compiling Your First Module
Section titled “3. Writing and Compiling Your First Module”Now that we have our environment set up and an account created, let's write and compile our first Move module. Unlike Ethereum where contracts exist independently, Move ties everything to accounts - both modules and their resources. Let's start with a simple example to understand the core concepts.
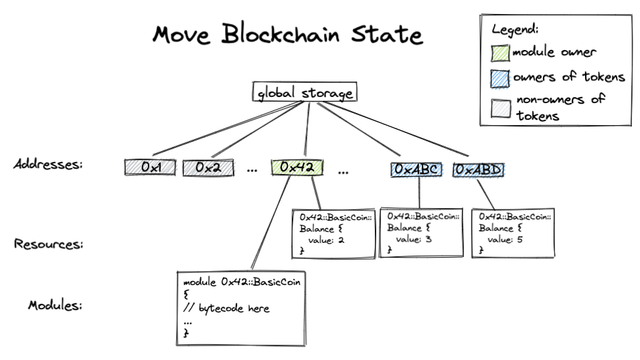
This diagram illustrates the relationship between module ownership, token ownership, and the Move blockchain state. It helps visualize how modules and resources are tied to accounts, emphasizing the unique aspects of Move's design compared to other blockchain platforms.
What is a Move Module?
Section titled “What is a Move Module?”Move modules are similar to smart contracts in other blockchains, with some key differences:
- Resources: Unlike Solidity where state is stored in contract variables, Move uses "resources" - special data types that can only exist in one place at a time and are always tied to an account
- Module-based: Rather than deploying entire contracts as independent units like in Solidity, Move code is organized into reusable modules that can share and handle resources across boundaries. Modules are more like standard library packages that can be published together or separately, offering finer-grained control over code organization.
- Safety by design: Move's type system and resource semantics help prevent common smart contract vulnerabilities
Your First Move Module
Section titled “Your First Move Module”Before we start, go to your VSCode (or Cursor) and install the Move On Aptos VSCode extension.
- Open VSCode (or Cursor) and navigate to the Extensions tab.
- Search for
Move On Aptospublished byaptoslabsand install the extension.
This extension will help us with the syntax highlighting, auto-completion, and other features that will make our development experience easier.
Our first module will be a simple message storage system that allows accounts to store and retrieve messages. Let's create a new move project within our my-first-module folder:
-
Initialize the project
Initialize a new move project with
aptos move init --name my_first_moduleThis creates a project structure with a
sourcesdirectory and aMove.tomlfile. -
Create the module file
Create a new file
sources/message.movewith our module code:module my_first_module::message {use std::string;use std::signer;struct MessageHolder has key, store, drop {message: string::String,}public entry fun set_message(account: &signer, message: string::String) acquires MessageHolder {let account_addr = signer::address_of(account);if (exists<MessageHolder>(account_addr)) {move_from<MessageHolder>(account_addr);};move_to(account, MessageHolder { message });}public fun get_message(account_addr: address): string::String acquires MessageHolder {assert!(exists<MessageHolder>(account_addr), 0);let message_holder = borrow_global<MessageHolder>(account_addr);message_holder.message}}Let's break down this module:
- We define a
MessageHolderresource type that can store a string message set_messageallows an account to store a messageget_messageallows anyone to retrieve a stored message- The
acquireskeyword indicates which resources the functions need access to (MessageHolder, in this case) move_toandmove_fromhandle the storage of resources under accounts
- We define a
-
Compile the module
Compile the Move module we just created with
aptos move compile --named-addresses my_first_module=defaultYou should see a message like this if it succeeded:
Terminal window ❯ aptos move compile --named-addresses my_first_module=defaultCompiling, may take a little while to download git dependencies...UPDATING GIT DEPENDENCY https://github.com/aptos-labs/aptos-framework.gitINCLUDING DEPENDENCY AptosFrameworkINCLUDING DEPENDENCY AptosStdlibINCLUDING DEPENDENCY MoveStdlibBUILDING my_first_module{"Result": ["9ec1cfa30b885a5c9d595f32f3381ec16d208734913b587be9e210f60be9f9ba::message"]}
Great job! We are now ready to test and debug.
4. Testing and Debugging
Section titled “4. Testing and Debugging”Testing and debugging are crucial parts of Move module development. Move has built-in support for unit testing and debug printing.
-
Add debug prints
First, let's modify our message module to add some debug prints. Update your
sources/message.move:module my_first_module::message {use std::string;use std::signer;use std::debug; // Add this for debug printsstruct MessageHolder has key, store, drop {message: string::String,}public entry fun set_message(account: &signer, message: string::String) acquires MessageHolder {let account_addr = signer::address_of(account);debug::print(&message); // Print the message being setif (exists<MessageHolder>(account_addr)) {debug::print(&string::utf8(b"Updating existing message")); // Print debug infomove_from<MessageHolder>(account_addr);} else {debug::print(&string::utf8(b"Creating new message")); // Print when creating new};move_to(account, MessageHolder { message });}public fun get_message(account_addr: address): string::String acquires MessageHolder {assert!(exists<MessageHolder>(account_addr), 0);let message_holder = borrow_global<MessageHolder>(account_addr);debug::print(&message_holder.message); // Print the retrieved messagemessage_holder.message}} -
Create test file
Create our tests: a new file
sources/message_tests.movewith:#[test_only]module my_first_module::message_tests {use std::string;use std::signer;use my_first_module::message;#[test(sender= @my_first_module)]fun test_set_and_get_message(sender: &signer) {// Test setting a messagemessage::set_message(sender, string::utf8(b"Hello World"));// Verify the message was set correctlylet stored_message = message::get_message(signer::address_of(sender));assert!(stored_message == string::utf8(b"Hello World"), 0)}#[test(sender=@my_first_module)]fun test_update_message(sender: &signer) {// Test setting a messagemessage::set_message(sender, string::utf8(b"Hello World"));// Test updating the messagemessage::set_message(sender, string::utf8(b"Hello Aptos"));// Verify the message was updated correctlylet stored_message = message::get_message(signer::address_of(sender));assert!(stored_message == string::utf8(b"Hello Aptos"), 0)}} -
Run the tests
Now run the tests with
aptos move test --named-addresses my_first_module=defaultYou should see output if the tests pass: (See below for how to handle errors)
Terminal window INCLUDING DEPENDENCY AptosFrameworkINCLUDING DEPENDENCY AptosStdlibINCLUDING DEPENDENCY MoveStdlibBUILDING my_first_moduleRunning Move unit tests[debug] "Hello World"[debug] "Creating new message"[debug] "Hello World"[ PASS ] 0x852a264419a80b27771f072b5cae8c8b358d4450e135e134e065247376a4357a::message_tests::test_set_and_get_message[debug] "Hello World"[debug] "Creating new message"[debug] "Hello Aptos"[debug] "Updating existing message"[debug] "Hello Aptos"[ PASS ] 0x852a264419a80b27771f072b5cae8c8b358d4450e135e134e065247376a4357a::message_tests::test_update_messageTest result: OK. Total tests: 2; passed: 2; failed: 0{"Result": "Success"}
If you encounter errors while testing, here are some common issues and solutions:
- Make sure all module dependencies are properly imported
- Check that your account address matches in the
-named-addressesparameter - Verify that test functions have the
#[test]attribute - Ensure string literals are properly encoded
5. Publishing Your Module
Section titled “5. Publishing Your Module”After successfully compiling and testing your module, you can publish it to the Aptos blockchain. This process deploys your code so that it's accessible on-chain.
-
Publish the module
Publish your module with
aptos move publish --named-addresses my_first_module=defaultYou'll see output showing the compilation process and then a prompt asking about gas fees:
Terminal window Compiling, may take a little while to download git dependencies...UPDATING GIT DEPENDENCY https://github.com/aptos-labs/aptos-framework.gitINCLUDING DEPENDENCY AptosFrameworkINCLUDING DEPENDENCY AptosStdlibINCLUDING DEPENDENCY MoveStdlibBUILDING my_first_modulepackage size 1271 bytesDo you want to submit a transaction for a range of [141300 - 211900] Octas at a gas unit price of 100 Octas? [yes/no] > -
Confirm the transaction
Type
yand press Enter to confirm the transaction.After confirmation, you'll receive a response showing the transaction details:
Terminal window {"Result": {"transaction_hash": "0x95fce7344b066abda10c07dbf1ffa83e0d9c7bd400e2b143682a6c8a5f179dc2","gas_used": 1413,"gas_unit_price": 100,"sender": "9ec1cfa30b885a5c9d595f32f3381ec16d208734913b587be9e210f60be9f9ba","sequence_number": 0,"success": true,"timestamp_us": 1735351260227638,"version": 273029731,"vm_status": "Executed successfully"}}
(Optional) Seeing Your Contract On-Chain
Section titled “(Optional) Seeing Your Contract On-Chain”After successful publication, you can verify your module is on-chain by following these steps:
-
Open the Explorer
Go to the Aptos Explorer
-
Check the transaction
Search for your account address. You should notice that there is a new transaction in your account, the
code::publish_package_txnfunction. -
View your balance
Click the "Coins" tab to see that you now have less than 1 APT of the Aptos Coin.

You have spent a small amount on gas to deploy the contract so should have around
0.99855 APTremaining. -
Find your module
Look under the "Modules" tab

-
Verify the module
You should see your "message" module listed
6. Interacting with Your Module
Section titled “6. Interacting with Your Module”Now that your module is published, you can interact with it through the Aptos CLI:
-
Set a message
Set a message using the CLI:
Terminal window aptos move run --function-id 'default::message::set_message' --args 'string:Hello, Aptos!'You'll see a gas fee prompt similar to what you saw during publishing.
-
Confirm the transaction
After confirming with
y, you should get a success response like:Terminal window Transaction submitted: https://explorer.aptoslabs.com/txn/0x0c0b1e56a31d037280278327eb8fdfcc469a20213e5e65accf6e7c56af574449?network=devnet{"Result": {"transaction_hash": "0x0c0b1e56a31d037280278327eb8fdfcc469a20213e5e65accf6e7c56af574449","gas_used": 445,"gas_unit_price": 100,"sender": "9ec1cfa30b885a5c9d595f32f3381ec16d208734913b587be9e210f60be9f9ba","sequence_number": 1,"success": true,"timestamp_us": 1735351754495208,"version": 273137362,"vm_status": "Executed successfully"}} -
View your message
View your stored message by checking under Resources on the Explorer.
-
Celebrate!
We did it!
Next Steps
Section titled “Next Steps”Congratulations! You've successfully:
- Compiled your first Move module
- Added tests to help debug
- Published your module on-chain
- Used your contract through the CLI
Now your published Move module can be connected to just like an API via one of our many Official SDKs!
Here are some suggested next steps to get a deeper understanding of Move modules:
- Try modifying the module to add a new feature. You can use the Move Book to build your understanding of writing Move modules.
- To understand how Move works on-chain, you can learn about Move's resource system.
- If you're building an application to interact with contracts or look up data from on-chain, learn how to use the SDKs here.
- Join the Aptos Discord to connect with other developers.